
That is one long, awkward post title. I don't know what to call this thing, but here it goes:

So I mentioned while reviewing the Idyllwild Top and Dress pattern from Itch to Stitch that I wanted to try the little strip of fabric at the back neck in my ready-to-wear tops. I already had the idea percolating in my brain from reading a post by Baste + Gather about adding twill tape, and the Idyllwild pattern mentioned it also as an option.
Inspection of my purchased tops showed that they use a little strip of knit fabric all neatly folded up, so I came up with a way to do this without burning my fingers ironing those little strips. You just need fusible tape like you could use to fix a hem in place. Here is an example.
Start with your knit top, after attaching the neckband and pressing but before top-stitching. Cut two lengths of fusible tape the length of your back neckline.

Fuse one piece of fusible tape the the wrong side of your lightweight knit. Keep the paper attached on top so that the tape doesn't fuse to your iron as well. You are just fusing one side of the tape for now. Leave a border around the tape.

Cut around the tape, leaving 1/4 - 3/8 inch border. Peel off the tape's paper backing.
Fold the long borders in and fuse them down. Fold in the short ends. These don't have anything to fuse to, but that's ok.

I used some scissors to hold those little ends down while they cooled. Then they stayed in place just fine.

** If you are able to iron all these little hems neatly without the fusible tape (and without burning yourself), leave out the strip of tape in the above steps. This will save a little on bulk in the finished project. I really like the precision and folding template that the fusible tape gives me.

Fuse the second piece of fusible tape on top of all the raw edges (again leaving the paper between the tape and the iron). Peel off the strip of paper.


Iron down the strip to cover the raw seam. It will fuse in place. Stitch 1/8" from the bottom edge of the strip.

It will look like this on the outside.

Now, finish top-stitching the neckline. blending the wider stitching on the back neckline with narrower stitching around the front. This matches my purchased ready-to-wear tees.


FYI, the links to Itch to Stitch are affiliate links. I promise I'm not getting rich. :-)

So I mentioned while reviewing the Idyllwild Top and Dress pattern from Itch to Stitch that I wanted to try the little strip of fabric at the back neck in my ready-to-wear tops. I already had the idea percolating in my brain from reading a post by Baste + Gather about adding twill tape, and the Idyllwild pattern mentioned it also as an option.
Inspection of my purchased tops showed that they use a little strip of knit fabric all neatly folded up, so I came up with a way to do this without burning my fingers ironing those little strips. You just need fusible tape like you could use to fix a hem in place. Here is an example.
Start with your knit top, after attaching the neckband and pressing but before top-stitching. Cut two lengths of fusible tape the length of your back neckline.

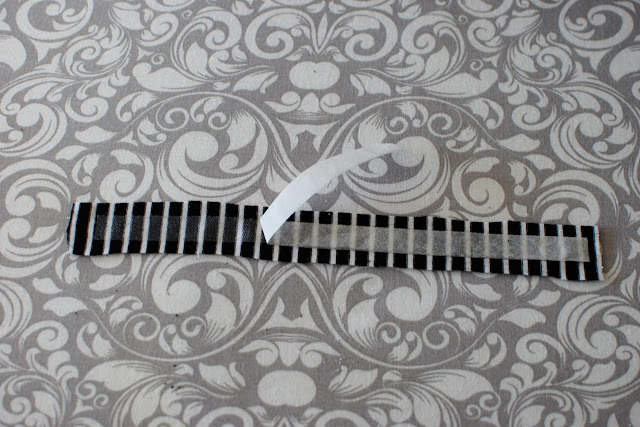
Fuse one piece of fusible tape the the wrong side of your lightweight knit. Keep the paper attached on top so that the tape doesn't fuse to your iron as well. You are just fusing one side of the tape for now. Leave a border around the tape.

Cut around the tape, leaving 1/4 - 3/8 inch border. Peel off the tape's paper backing.

Fold the long borders in and fuse them down. Fold in the short ends. These don't have anything to fuse to, but that's ok.

I used some scissors to hold those little ends down while they cooled. Then they stayed in place just fine.

** If you are able to iron all these little hems neatly without the fusible tape (and without burning yourself), leave out the strip of tape in the above steps. This will save a little on bulk in the finished project. I really like the precision and folding template that the fusible tape gives me.

Fuse the second piece of fusible tape on top of all the raw edges (again leaving the paper between the tape and the iron). Peel off the strip of paper.

Now the fun part: Pin (don't fuse!) the entire knit strip to the back neckline, overlapping the stitching line by 1/8". My handy scissors are pointing to the stitching line. Stitch again right on top of that stitching to hold the strip in place.

Iron down the strip to cover the raw seam. It will fuse in place. Stitch 1/8" from the bottom edge of the strip.

It will look like this on the outside.


Voila! A pretty detail that also keeps the back neckline from rolling out.

FYI, the links to Itch to Stitch are affiliate links. I promise I'm not getting rich. :-)
Thanks! I love tutorials! I haven't made a shirt yet, but I've spent a bit of time pondering that detail in my RTW shirts! I will definitely refer to this tutorial when I get around to finishing a t-shirt that I started some time ago... :-)
ReplyDeleteThank you for this alternative - I do cover the seam (as well as top stitch the serged edge down). But your idea here is one I hadn't thought of. Nice!
ReplyDelete