Wednesday, December 30, 2015

Spectrum by Joji Locatelli

I spent the last month furiously sewing and knitting gifts.  Not so much that I got overwhelmed and regretful of my plans, but enough to keep me busy with less crafting time for myself.  I have photos of some of those creations, but first, I want to show my most recent knit for myself!

This is Spectrum by Joji Locatelli.  I cast this off the needles two days ago, blocked it that night, and wore it yesterday.  I love the bold chevron stripes on this, but I chose low contrast colors, hoping this would be good to wear on warmer days.  Since it was in the 80s yesterday, it passed the test.

 The yarn is Bernat Cotton-ish, which I got at JoAnn's.  I have so many wool shawl/scarfs, and I wanted to try one in a cotton blend.


Not a bad job by my 6-year-old photographer.  I have found that paying $1 per photo shoot greatly improves their conscientiousness in the matter.

I cast on my next project for myself right away - Jujuy from the same collection by Joji.  I really need to get back to the second sleeve for my other son's sweater.  Yep, I wrapped up a sweater with one sleeve for him.  Sorry, Baby, that's life with a mom-knitter.

Monday, November 30, 2015

Brooklyn Tweed Seacoast Sweater by Joji Locatelli

So, I knit this sweater in the span of 3-4 weeks in early October.  It is the lovely Seacoast design by Joji Locatelli for Broolyn Tweed.  I knit it, in part, to join in the Joji knit along on Ravelry.  So, I've had this sweater finished for over a month, and my kiddo took the photos last week.  Now when do I decide to upload the photos and post them to the knit along thread?  Why that very last day for entry, of course!... when Ravelry hasn't been up and working all day.

Oh well.  That's what I get for my typical procrastination.
I followed the pattern exactly except for lengthening the sleeves for my monkey arms.  I have an entire skein of yarn left over and am toying with the idea of knitting on to the ribbing at the bottom for a real tunic length.  That's the beauty of a top-down construction. 
 The yarn is Malabrigo Merino Worsted in the Ravelry Red color.  I hemmed and hawed between Malabrigo Merino Worsted (non-superwash) and Rios (superwash).  In the end, I went with the classic non-superwash.  I purchased it online and didn't realize it is a single-ply, though. It seams sturdy enough knitted up, but it has a slight velcro-like tendency whenever it comes in contact with dog hair, and we have lots of dog hair around here.
 Yes, I am wearing velvet leggings as pants.  What of it?  A sweater this comfy kind of demands it.  It will work equally well with boring jeans, I'm sure.
 I'm really happy with the fit and style of this sweater.  It was a simple, quick sweater to knit, but the neckline is really unique and flattering.

Thursday, November 5, 2015

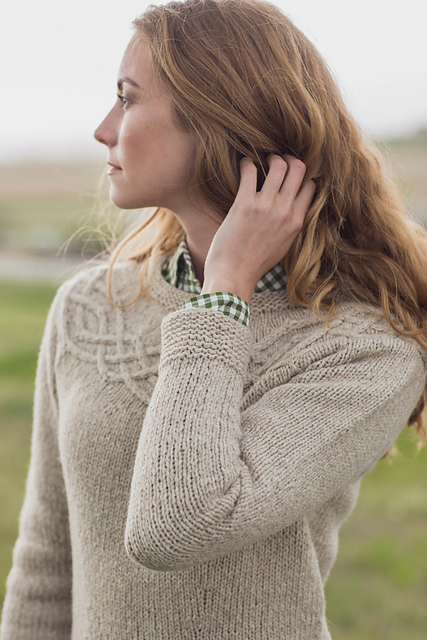
Leitmotif Cardigan Interweave Knits Fall 2010

I have had this sweater finished for months.  I knit it over the summer.  The pattern is the Leitmotif Cardigan from Interweave Knits Fall 2010.  The yarn is O-Wool Balance, a 50% wool/50% cotton worsted.
 This is a great cardigan for our warm climate.  The lacy section breathes and the shorter sleeves are comfortable.  This is a great throw-on piece for the air conditioning.  The only thing that bugs me is the front band rolls a lot more than in the pattern photos.  Right after I block it or steam it, they lay flat, but not for very long.
 I guess this looks a bit questionable with shorts since the cardi is longer than my shorts hem.  Oh well.  It looks great with skinny jeans, but it was a warm day!

I omitted the closure on this cardigan thinking I could always add one later.  It stays on my shoulders nicely, though, so I feel no need.  These sleeves are knit by picking up stitches around the armhole and knitting short rows for the cap.  I'd like to use this technique again but will pay more attention to the stitch counts since these came out a little wider than I would prefer.
Overall, this isn't my best sweater in terms of fit and details, but I do wear it quite often, so it's a win.  I do see more cotton/wool blend yarns in my future!

Sunday, November 1, 2015

McCalls 7186 Draped Jersey Dress

Hello!  I hope you had a great Halloween.  It's not really my favorite holiday, but my boys really enjoyed themselves, and we're one step closer to Thanksgiving and Christmas!

I want to share a recent creation, McCalls 7186, which is a great, flattering pattern.  (My hair is a mess in these photos.  I blame the wind.)
 There are basically two versions of this dress in the pattern - both have gathers at the shoulders and a wrap-style bodice.  One view also has gathers at the waist while the other does not.  I used the waist gathers and think they are super flattering.  There are also various sleeve options.  I went with long sleeves, because I have maybe one other long-sleeved dress in my closet, and I had enough fabric, so why not?

Here is the line drawing:

 My fabric is a lightweight rayon knit from Pennie Fabrics in Sarasota.  I really like the not-quite-animal print.  It's a little more wild than I am usually drawn to, but I think the earth tones calm it down a bit.  I received many compliments on this dress today.
 I have one caution if you make this pattern.  This view with the waist gathers has two separate front pieces - one for the upper layer and one for the under layer.  When cutting out the fabric, you need to place one pattern piece print-side-up and the other print-side-down.  I'm not sure if this was some kind of mistake in printing or what, but I'm glad I thought through how the pieces would go together before blindly cutting or I would have had a one-shouldered dress.

One change I made to the pattern was to make the skirt roomier.  I knew this lightweight knit could get super va va voom with a form-fitting skirt, so mine is cut more A-line.  I also need to wear a slip under this dress to feel comfortable with the single layer of knit on the back.
 Close-up of the draping detail.  I needed to do a bit of adjusting of the drape at the side seam, but I knew that was likely and used long basting stitches on the side seams at first.
 Here you can see how the draped neckline becomes the back collar. I like this detail.
 I love this type of neckline.
I am really happy with this dress and think I will probably make another at some point.  It would also be a really cute top or tunic.  We'll see what fabric wants to be another version..

Friday, October 30, 2015

Podcast 15: A Coat

SHOWNOTES

      SSHandmade_Jenny on Instagram
      JennyAnne on Ravelry

Life - Here is a pic of my new sewing space.  I just need some better lighting!              

Goodies - I mentioned Myra
                 The fabrics from Pennie Fabrics that I mentioned for making an outfit:
                           

                 Gorgeous Fabrics
                 Ottoman striped fabric to make the tops in the second or tenth photo of this post

Sewing - Simplicity 1696
                recent pants I mentioned
                McCalls 7186 knit dress
                Burda 7765
                McCalls 5428
                McCalls 7162 peplum top
                Atkinson Designs  Wine and Dine


Knitting - Tucker Sweater from Interweave Knits Fall 2015
                                     
                                                                 Here is mine:                                                              

                                          Lace Saddle Tee in Malabrigo Arroyo
                                          My Sister's Sweater                                                     
                                                                   

                                        Butterbluemchen socks in Yarn Love Elinore Dashwood Arabian Nights

New to the Queue - Waffle Patterns
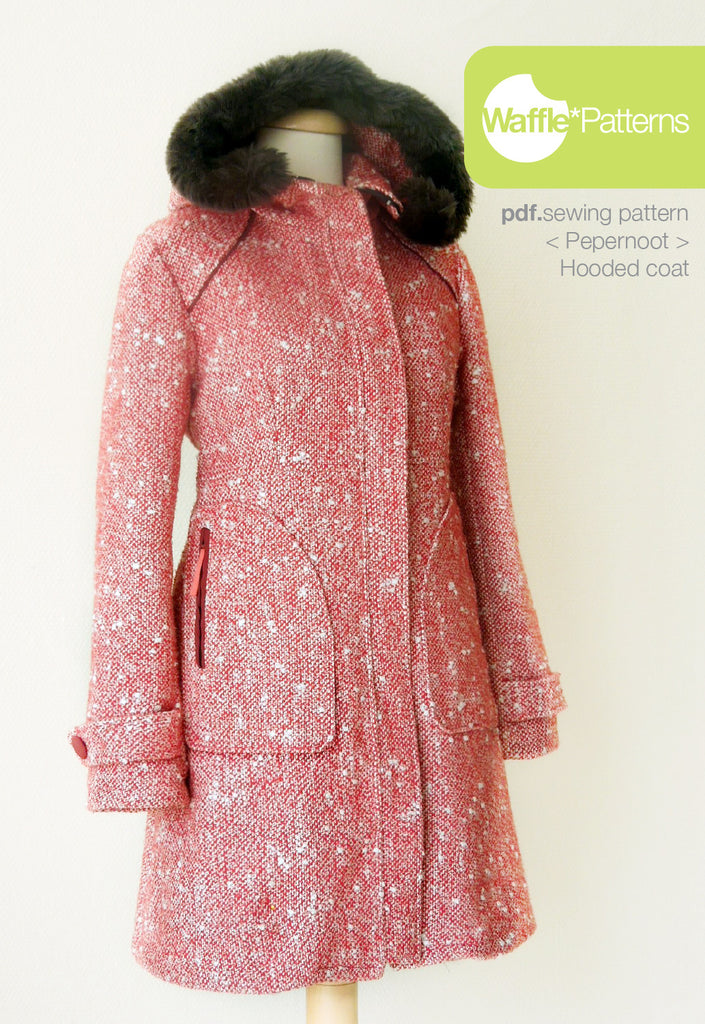
                                 Pepernoot Hooded Coat

My fabrics:


Saturday, October 17, 2015

Knit Tops - Cover the Back Neck Seam With a Knit Strip Tutorial

That is one long, awkward post title.  I don't know what to call this thing, but here it goes:

So I mentioned while reviewing the Idyllwild Top and Dress pattern from Itch to Stitch that I wanted to try the little strip of fabric at the back neck in my ready-to-wear tops. I already had the idea percolating in my brain from reading a post by Baste + Gather about adding twill tape, and the Idyllwild pattern mentioned it also as an option.

Inspection of my purchased tops showed that they use a little strip of knit fabric all neatly folded up, so I came up with a way to do this without burning my fingers ironing those little strips.  You just need fusible tape like you could use to fix a hem in place.  Here is an example.

Start with your knit top, after attaching the neckband and pressing but before top-stitching.  Cut two lengths of fusible tape the length of your back neckline.


Fuse one piece of fusible tape the the wrong side of your lightweight knit.  Keep the paper attached on top so that the tape doesn't fuse to your iron as well.  You are just fusing one side of the tape for now.  Leave a border around the tape.


Cut around the tape, leaving 1/4 - 3/8 inch border.  Peel off the tape's paper backing.


Fold the long borders in and fuse them down.  Fold in the short ends.  These don't have anything to fuse to, but that's ok.


I used some scissors to hold those little ends down while they cooled.  Then they stayed in place just fine.


** If you are able to iron all these little hems neatly without the fusible tape (and without burning yourself), leave out the strip of tape in the above steps.  This will save a little on bulk in the finished project.  I really like the precision and folding template that the fusible tape gives me.


Fuse the second piece of fusible tape on top of all the raw edges (again leaving the paper between the tape and the iron).  Peel off the strip of paper.


Now the fun part:  Pin (don't fuse!) the entire knit strip to the back neckline, overlapping the stitching line by 1/8".  My handy scissors are pointing to the stitching line.  Stitch again right on top of that stitching to hold the strip in place.  


Iron down the strip to cover the raw seam.  It will fuse in place.  Stitch 1/8" from the bottom edge of the strip.


It will look like this on the outside.


 Now, finish top-stitching the neckline.  blending the wider stitching on the back neckline with narrower stitching around the front.  This matches my purchased ready-to-wear tees.


Voila!  A pretty detail that also keeps the back neckline from rolling out.


FYI, the links to Itch to Stitch are affiliate links.  I promise I'm not getting rich.  :-)

Friday, October 16, 2015

Itch to Stitch Idyllwild in ponte

This is my first version of Itch to Stitch's Idyllwild Top and Dress pattern.  I've been using the super out-of-print Butterick 3344 for many years as my basic tee shirt pattern. I figured it was time for an upgrade since that one is falling apart and skin-tight (in the style of 10 years ago).  I bought this pattern a while ago when it was first released for $1.  The price has gone up, but it is still a great pattern.

This pattern offers two rounded neckline options (I made the deeper one) and lots of sleeve options.  There are also options for ruching on the long sleeves and the body of the top.  My measurements put me smack dab between an XS and a S, so I just cut right in between the two sizes.  I'll size down on my next version.  I took a bit out of the side seams after putting together the body of this one, but I also think the roomier fit would be fine with a more lightweight fabric - just not this ponte.

 This is one beefy tee.  The fabric is from my beloved Pennie Fabrics in Sarasota.  In hindsight, it would have made a fab ponte dress, but I had my mind set on a tee.

I think I prefer it tucked in like this.

Here it is untucked.  Not loving that look in this fabric.  This feels like a dressier tee, not one I will throw on with my yoga pants for a 7:30 am bike ride to school.

It's funny I never know what creations will be a hit with the Hubs.  This is the most basic of basic tees, but he really liked it and noticed the contrast inside neck band :-) which brings us to...
 Probably my favorite detail of this tee is the little striped strip that I added to the back neckline.  This really elevates the whole top.  I'd had the idea in my head after reading this post, and Kennis actually does mention this step in her pattern, which is an awesome detail.  I think she suggests bias tape, but after some serious inspection of my ready-to-wear tees, I discovered they have strips of lightweight knit fabric.  I pulled this bit out of my fabric scraps and am thrilled to pieces with the result.  I photographed my process and plan to do a little tutorial about it.

Here is the view on the outside of the back.  The wider top-stitching on the back than on the front is taken straight from my ready-to-wear tees.


FYI, the links to Itch to Stitch are affiliate links.  I promise I'm not getting rich.  :-)